
This tutorial will show how to create your own blog, personal site, portfolio or landing page in GitHub Pages using Hugo and how to automate the process with Travis CI.
Requirements
- Git. Follow the download/install instructions according to your platform.
- Hugo. You need to have Hugo installed in your local system.
- GitHub account. In order to host your blog or personal site you need to have to Sign-up to GitHub if you do not have an account already.
- (Optional) A secondary GitHub account. This is is particular useful to increase security regarding your main GitHub account. See more below.
Create repositories
This setup will use two repositories one for the sources used by Hugo and another one for blog/site.
- Head over to GitHub and create a new repository named
username.github.io, whereusernameis your username (or organization name) on GitHub. - Create a second repository for the sources/skeleton of the site:
blog. The name is completely arbitrary but this tutorial will assume the use ofblog.
Use Hugo to create a site
If you are not familiar with Hugo, follow the quick-start. Here is a summary of it:
Initialize a site using Hugo. This will create a skeleton for the your site:
hugo new site blogInit a git project and install a theme (as a git submodule):
cd blog
# Init git repository
git init
# Download the theme as a git submodule
git submodule add \
  https://github.com/budparr/gohugo-theme-ananke.git themes/ananke
# Edit your config.toml configuration file
# and add the Ananke theme.
echo 'theme = "ananke"' >> config.toml
# Do not track /public directory in git
echo '/public' >> .gitignore
(Optional) Create some content and configure your Hugo site:
Create a new post and add some content:
hugo new posts/my-first-post.mdEdit the new post
posts/my-first-post.md:--- title: "My First Post" date: 2019-03-26T08:47:11+01:00 draft: false --- This is my first postOpen up config.toml in a text editor:
baseURL = "https://example.org/"
languageCode = "en-us"
title = "My New Hugo Site"
theme = "ananke"
Preview the site:
hugo server
Commit your changes and setup your repository:
# In case you created the repository in GitHub already
git remote add origin git@github.com:username/blog.git
# Add all the skeleton of the site
git add .
# First commit
git commit -m "Initial commit"
Create GitHub bot account
In order to give Travis CI the power to publish the generated site in username.github.io a GitHub Personal Access Token is needed (or the credentials of the repository owner). The token needs have the repo scope, therefore it will grant access to all the repositories that the user have permissions, including those from the organization it belongs. It is then a too much powerful access only for publishing a personal site.
If a separate account is used instead, access could be given only to username.github.io repository. That is more secure.
A trick is to use Gmail email aliases, so an account as
username+blog-bot@gmail.comcan be created.
Once the account is created, create a personal access token with repo permissions:
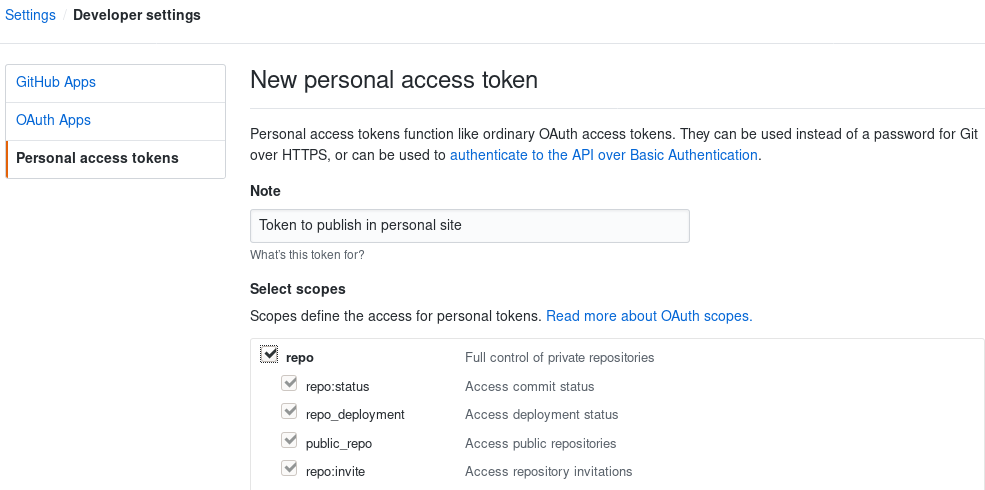
Copy the value of the token to use it later for the Travis CI configuration.
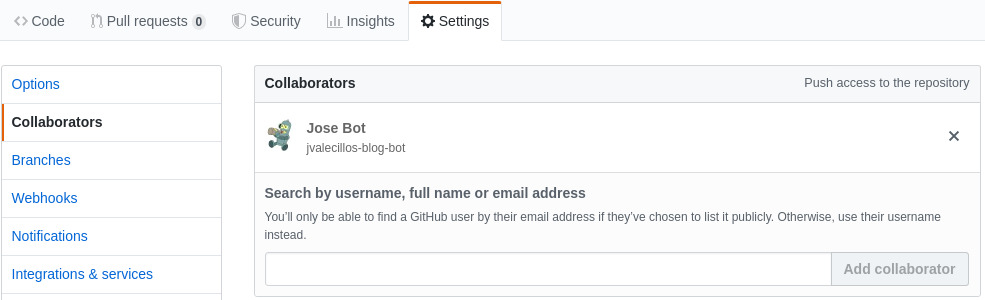
Also add the bot user as a collaborator in username.github.io:
Configure Travis CI
Sign-in in travis-ci.com with your main GitHub account and authorize access to the blog repository.
In the settings for the repository in Travis CI, configure an environment variable with the name GITHUB_TOKEN and set the value of the personal access token from the GitHub bot account.

Create travis build
Create a
.travis.ymlfile in the root of theblogrepository with the following configuration (for more information check Travis CI GitHub Pages Deployment):dist: bionic # Ubuntu distribution language: go # programming language go: - master # This will use the latest version of the language # Install hugo extended using snaps addons: snaps: - name: hugo channel: extended/stable # will be passed to --channel flag script: - hugo # This commands builds your website on travis deploy: provider: pages # GitHub Pages Deployment skip_cleanup: true # prevents delete all the files created during the build that you are trying to upload local_dir: public # Default static site output dir for Hugo repo: username/username.github.io # This is the slug of the repo you want to deploy your site to target_branch: master # Branch to push local_dir contents to, defaults to gh-pages github_token: $GITHUB_TOKEN # Set in the settings page of your repository, as a secure variable keep_history: true # Optional, create incremental commit instead of doing push force, defaults to false email: your_email+blog-bot@gmail.com on: branch: master # this is the branch were changes are pushedCommit
.travis.yml:git add .travis.yml git commit -m "Adding travis ci automation"
This will trigger a build on Travis CI which in turn will run Hugo to generate the static site. The generated files will be committed and pushed to
username.github.iorepository. Then, finally the site will be available under https://username.github.io.
Now, the workflow for working on the personal site is as simple as working in the blog repository, committing and pushing content to it, then the content will be transformed and published automatically in GitHub Pages.
See also:
- Using Hugo with Travis CI on GitHub Pages by Martin Kaptein.
- Hugo on GitHub Pages with Travis CI by Artem Sidorenko.
- How to use a custom domain.